August 2018
OpenTTD is a free, open-source recreation of the Chris Sawyer masterpiece: Transport Tycoon. I lost many hours playing this after opening it for Christmas in 1994. (alongside Outpost, and Global Domination -- thanks, dad!)
The three goals for this project:
- Share steps that beginners can follow to take apart any large open-source project
- Do it by example with OpenTTD
- Add an active, intermediate-difficulty project to my library of decoded work
This project deviates from my usual practice of documenting every line of code. It's not practical to take apart over 200,000 lines, especially for an actively developed project. Instead, I will pick and choose the key ideas that an aspiring contributor may want to dig in to. Above all, this exercise should be transferable to other projects.
Here's the plan of attack:
- The setup
- Code overview
- Organization
- Game Object Model
- Engine core
- Startup & Initialization
- Game loop
- Honorable Mentions
- Appendix
Full Disclosure: I am not an OpenTTD contributor, nor am I a community member.
These guys are the heroes behind this project so please give credit where it's due.
I'm looking at the code base with fresh eyes in order to relate my learning approach with beginners who struggle to dig in to similarly large projects. I hope to make this as useful as possible in two weeks of decoding effort against a project that dozens of professionals built over the last 15 years.
Part 1 - Getting Started
Goal: Get the code and build it
We won't get far without source code. I've fetched the recent public release (v1.8) and created a personal GitHub repo. All code analysis will apply to only this version. Much of the code base has stabilized and I expect that most of what we learn from 1.8 will remain true going forward. For reference, here is the official repo that I pulled this version from.
I was pleasantly surprised that the code was able to build with no effort, despite my CentOS system not being on the list of supported distros. Since Fedora is closest, I made sure that I had those dependencies covered. Otherwise, the following command sequence was enough to get the source code up and running:
$ ./configure
 [...output cut...]
$ make
 [...output cut...]
Note: All shell commands issued from $(openttd)/src
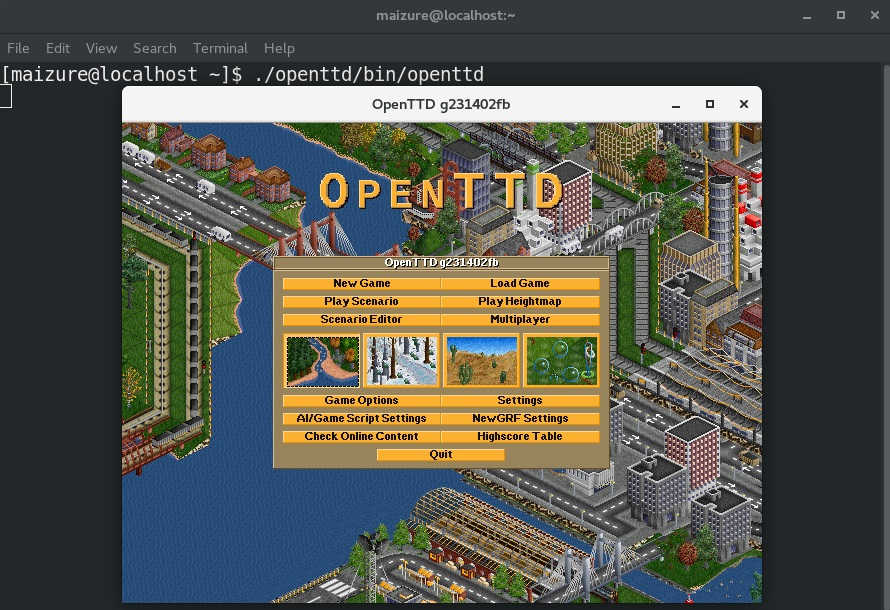
We have one more step to go. The OpenTTD source code is not distributed with graphics or sound assets. We have to pull those assets from the website, then extract them in bin/baseset. After that, we can execute the binary as shown in the screen shot at the top of this page.
Now we have the code, and it's working. Let's take a cursory look at what we're dealing with
Part 2 - First Look at the Source
Goal: Review the code to determine prerequisite knowledge
Let's start with some easy questions: How much code is there? What language(s)? Which variant of those languages? What style rules are enforced?
We can start by 'cloc'ing the code base. (cloc is a utility for counting lines of code)
$ cloc .
---------------------------------------------------------------------
Language           files          blank        comment           code
---------------------------------------------------------------------
C++                  420          35414          41880         162299
C/C++ Header         600          12881          30898          54200
INI                    7            501             75           4194
Objective C++          6            743            667           2519
awk                    3            124            102            747
C                      2             62            121            483
Bourne Shell           3             39             27            137
---------------------------------------------------------------------
SUM:                1041          49764          73770         224579
---------------------------------------------------------------------
The majority of the code base is C++. A handful of other files comprise the system-dependent code (INI=Windows, Bash/awk = Linux/Unix, ObjC++ = MacOS). We'll focus entirely on the C++. But before digging any further, I highly recommend reading the developer's style guide to understand how the soft rules for code presentation. Knowing the presentation simplifies digging through the code, especially when using regular expressions.
C++ has been constantly evolving for over 30 years, so we should try to understand which era of C++ and its features that we're dealing with. The style guide helps a bit. Another quick method is to scrape the code for the system includes.
$ grep -ER "#include <" .
  [...output here...]
The results show that all headers are prior to C++11. This is a good sign that we're dealing with basic C++ features. Notice that many of the include directives use the C standard header names. The original developers likely favored C and are probably just using the most useful features of C++ (i.e. classes and templates). An anecdotal test is to see if 'printf' is favored over 'cout' in the source.
$ grep -ER "cout" . | wc -l
0     ## No usage of cout (C++)
$ grep -ER " printf" . | wc -l
22    ## 22 references to printf (C)
Just for fun, let's take a look at the STL components we may run across:
$ grep -ER "std::" .
  [...output here...]
$ grep -ER "std::" . | wc -l
164     ## Total references
$ grep -ER "std::map" . | wc -l
41      ## Most common reference: map
$ grep -ER "std::list" . | wc -l
33      ## 2nd most common reference: list
$ grep -ER "std::string" . | wc -l
21      ## 3rd most common reference: string
$ grep -ER "std::pair" . | wc -l
14      ## 4th most common reference: pair
$ grep -ER "std::vector" . | wc -l
14      ## 5th most common reference: vector
You may be shocked to see only 164 references to the STL in a project of this size. The reason is that the OpenTTD developers rolled their own type-safe implementations and didn't bother with STL. This is one of the more interesting parts of this codebase. I'll be watching to see if evolving C++ standards lead them to reconsider this approach. But since it's not broken...
After sifting through the source code with several more greps, I had a good idea of what to expect:
OpenTTD at first glance
- No cutting-edge C++ features (C++11 and later). Feels like a C codebase with extras
- Inheritance hierarchy (OOP) favored over components (ECS)
- Several 3rd party libraries and frameworks (Cocoa, Allegro, SDL, etc)
- Some system-dependent code for (Windows, Linux, and MacOS)
- Some concurrency: Understand mutex locks and critical sections
- Generic programming heavy - know your templates
- Custom substitutes for common STL elements: map, list, vector, set, etc
- Over 800 classes/structs defined
- Many typedefs, macros, and other preprocessor-fu
- The source uses automatic documentation (Doxygen) -- use it!
Part 3 - Organization
Goal: Understand the code structure
All game source code is located under (openttd)/src. Most game classes are found here and loosely follows this convention:
- classname.[cpp|h] -- Basic class functions, (de|con)structors
- classname_func.h -- Declares functions for the object
- classname_cmd.cpp -- Defines object functions often used as callbacks
- classname_type.[cpp|h] -- Defines class objects, constants, flags, etc
- classname_base.[cpp|h] -- Defines a base class intended for inheritance
- classname_gui.[cpp|h] -- Extends object with GUI window interactions
- classname_map.[cpp|h] -- Extends object with map tile interactions
There are more than a dozen subdirectories of source code below the top level:
$ ls -dl ../src/* | grep "^d" | cut -b 52-80
./src/3rdparty       ## External support libraries
./src/ai             ## AI subsystem
./src/blitter        ## Low-level graphics pipeline
./src/core           ## Engine foundation code
./src/depend         ## Dependency generator (*nix)
./src/game           ## Game script subsystem
./src/lang           ## Localization text
./src/linkgraph      ## Cargo stock/flow logic
./src/misc           ## Other support code (pathing tools)
./src/music          ## Music for all supported architectures
./src/network        ## Internet things
./src/os             ## System-dependent init and entry
./src/pathfinder     ## Various pathfinding routines
./src/saveload       ## Save and load game routines
./src/script         ## Squirrel scripting subsystem
./src/settingsgen    ## Settings loader
./src/sound          ## Sound for all supported arch
./src/spriteloader   ## Loader for graphics assets
./src/strgen         ## Localization builder
./src/table          ## Game data tables
./src/thread         ## Thread support for all arch
./src/video          ## Graphics for all arch
./src/widgets        ## GUI headers
We'll focus on the base source directory (src/) and one highlighted above (src/core/). 'core' holds the memory allocators, type-safe function (re)definitions, and several other tools. These two directories (and a handful of other files) constitute the game engine.
Historical note: Game engine patterns are always evolving. Many years ago (up to about 1985), games didn't distinguish play logic from platform or housekeeping code. Code was organized procedurally with little thought for reuse or scalability. By the late 1980s, developers started to separate code in to an 'engine' side providing a thin service-layer and a 'game' side supporting assets and play logic (See iD for Commander Keen and Wolfenstein 3D). These early patterns still tightly-coupled the engine to the game. By the time Quake landed (mid-1990s), we see the nascent idea of an engine as a distinct program. Asset replacement and modding became well-supported (w/o cheap hacks), but the coupling was still there. By 2000, Quake 3 and Unreal were close to completing the separation. Today, game engines are sandboxes, complete with their own scripting languages and cross-platform interfaces capable of realizing a wide variety of digital dreams. Tomorrow's engine will probably be its own operating system!
The OpenTTD design is contemporary to its inception in 2003: The engine and game logic are tightly-coupled, but it does include a scripting language (Squirrel) for some subsystems. This is sufficient since the OpenTTD engine is designed to support only this application.
Part 4 - Object Model Overview
Goal: Identify common object patterns in the code base
OpenTTD follows an object-oriented design philosophy. Most interactive behaviors are constructed through a hierarchy of objects and tailored to a specific end-use through inheritance and polymorphism. The bulk of the 1000+ source files flesh out these objects. An unavoidable challenge for beginners is understanding the 'language' of a large project. That is, knowing the namespace, common patterns, and other idiosyncrasies in order to code read without being overwhelmed. For this section, I'm going to avoid digging deep in to code in favor of a visual introduction to the language of the OpenTTD.Let's start with a typical scene from the player perspective and try to connect what we see (instances) to objects
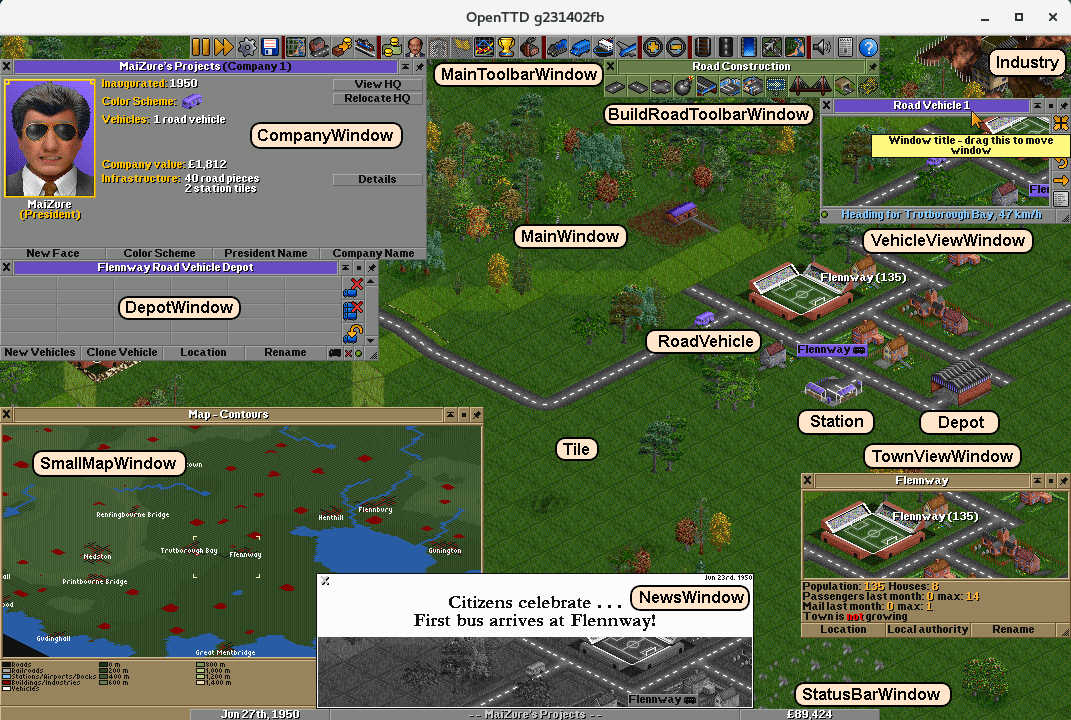
This annotated screenshot shows that a GUI system of windows and widgets drives the display and receives input from the player. Behind the GUI is a world consisting of a tile grid constantly updating through each trip through the game loop. Various vehicles, buildings, and other features live in the world. I'm going to walk one type of instance and show its components, construction, and interactions. The patterns are mostly shared between similar game objects.
Windows
Over 100 concrete window types are used in the game including the 10 pictured above (all named SomeNameWindow). This includes the main game display window that's always open and visible.
The Window hierarchy generally looks like this:
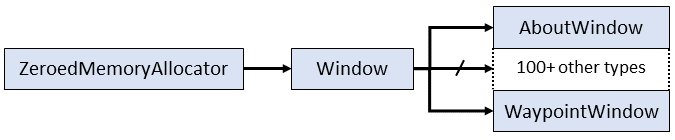
The ZeroedMemoryAllocator parent is a memory management service provided by the engine core that we'll cover in the next part. Window is a base class which includes common data (location, size) and methods such as input handlers and game loop tick updates. The concrete window object builds the specific layout for that window type using nested widgets. The final contents of a window usually include:
- Title caption
- Viewport
- Close, minimize, pin buttons
- Text areas
- Various widgets (action buttons)
You can further explore the Window hierarchy using the doxygen documentation on the OpenTTD wiki.
Let's consider the CompanyWindow instance pictured above:

This instance begins its life when the player clicks the company button in the toolbar. The callback assigned to the button creates the company window as we see above.
The CompanyWindow contains a number of widgets inside. These widgets will spawn other subwindows displaying settings relevant to the company. All code for the CompanyWindow and children is located in company_gui.cpp. Key ideas of windows are:
The layout
The window layout is a struct of widget construction procedures.
static const NWidgetPart _nested_company_widgets[] = {
  NWidget(NWID_HORIZONTAL),                          /* Top row container */
    NWidget(WWT_CLOSEBOX, COLOUR_GREY),              /* Close button */
    NWidget(WWT_CAPTION, COLOUR_GREY, WID_C_CAPTION),/* Title bar */
      SetDataTip(STR_COMPANY_VIEW_CAPTION,           /* Title caption */
                 STR_TOOLTIP_WINDOW_TITLE_DRAG_THIS),/* Title hover */
    NWidget(WWT_SHADEBOX, COLOUR_GREY),              /* Shade button */
    NWidget(WWT_STICKYBOX, COLOUR_GREY),             /* Pin button */
  EndContainer(),                                    /* End of container */
  [...cut for space -- see link above...]
};
The first half-dozen lines describe the top bar of the window. Not Shown: The last dozen create the bottom row of buttons (not shown). Everything in the middle is the central pane. We'll cover more about the widget system, just know for now that is a tree of containers specified as a static structure.
Window Interactions
Players click on a button to open new windows or more widgets. The CompanyWindow receives the click event and chooses and action based on the widget assigned to the click location. For instance, if the user clicks on "New Face", the following procedure kicks off:
struct CompanyWindow : Window {
  virtual void OnClick(Point pt, int widget, int click_count)
  {
      switch (widget) {
        case WID_C_NEW_FACE: DoSelectCompanyManagerFace(this); break;
      }
  }
};
We'll take a closer look at click dispatch in part 7 (game loop)
Widgets
Widgets are the interaction workhorse in OpenTTD. Almost everything visible in a window in built as tree of widgets. The base struct of all Windows includes a widget tree root of type NWidgetBase. Many types of usable widgets live in the leaves of the tree. Refer to the documentation for a detailed description of widget objects. Note that the documentation is directed towards developers using the widgets and not specifically about how they're implemented. I recommend reading widget_type.h thoroughly.
Here's a look at the widget hierarchy with the most specific types highlighted in green.
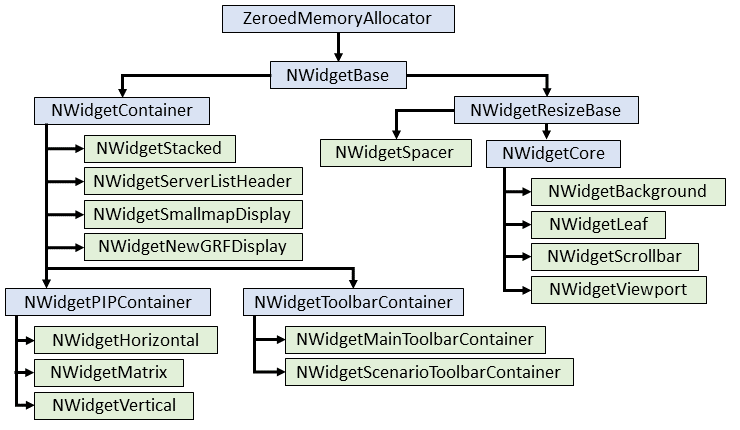
The green objects are the child objects that are visible during gameplay. These instances generally have one of two effects: They either provide buttons, sliders, and other interaction OR they provide containers and spacing for another nest of widgets. The names of the green objects are a good hint about their final purpose. For the blue objects, I want to discuss what capabilities they add, which are inherited (or overridden) by the children.
| Parent Object | Capability Added |
|---|---|
| ZeroedMemoryAllocator | Basic memory allocation covered in Part 5 |
| NWidgetBase | Adds core variables (width, size, type, flags, etc) and declares virtual methods |
| NWidgetContainer | Defines methods to add nested widgets and defines pointers to the widget list |
| NWidgetPIPContainer | Container with configurable spacing for a widget array |
| NWidgetToolbarContainer | Specialized container used specifically for toolbars arrangements |
| NWidgetResizeBase | Adds size constraint variables and methods to change size |
| NWidgetCore | Defines variables for visible features and associated getters and setters |
Vehicles
Vehicles are the backbone of OpenTTD -- without them, there is no game. Most game systems interact with vehicle instances during gameplay; Consequently, taking advantage of code reuse for such complex and coupled objects results in an intimidating inheritance tree:
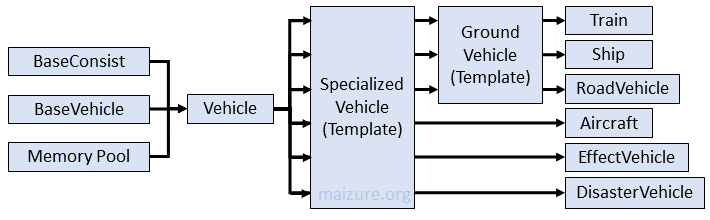
Final types of game vehicles are on the right side. These final types define the GUI interactions, game loop hooks, and graphics properties. As before, let's walk through each of these blocks point out what they contribute.
| Object | Purpose |
|---|---|
| Memory Pool | Type-safe memory allocation covered in Part 5 |
| BaseVehicle | Provides one field: the vehicle type |
| BaseConsist | Adds variables for vehicle time management (executing orders, counters, etc) |
| Vehicle | Includes the majority of common Vehicle data and methods |
| SpecializedVehicle | Type-specific accessor methods for Vehicle and component lookup |
| GroundVehicle | Type-specific template object for common ground vehicle variables and methods. Many are related to ground travel such as slope, speed, and ground height offsets. |
| Train | Adds train-specific functions and callbacks; Such calculations for multiple carriage types |
| Ship | Defines ship-specific movement |
| RoadVehicle | Adds specific properties (ie. acceleration) for final vehicles types which include busses, tankers, haulers, etc. |
| Aircraft | Aircraft some unique considerations like fuel range and the possibility of crashing |
| EffectVehicle | Visual effects that are treated like moving vehicles, such as smoke, explosions, construction vehicles, etc |
| DisasterVehicle | Disaster specific vehicles such as UFOs and Zeppelins |
Buildings (Industry/Stations/Depots)
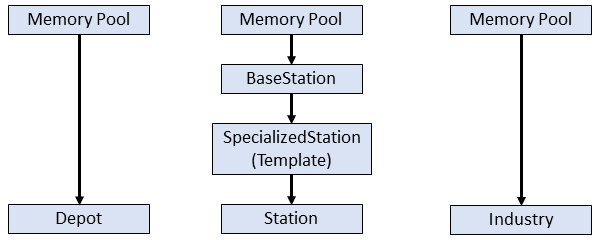
These three kinds buildings borrow many of the ideas already shown above so I won't bother to repeat. However, there are some useful things to know:
Depot objects encompass all possible types of transport: Trains, Ships, Road, and Aircraft. The type of the depot matches the underlying map tile type. This forces many of the GUI interactions to confirm the type of the depot before performing operations. Lots of 'switch' checks
Stations inherit a SpecializedStation template class based on the specific station type. Like Vehicles, this allows overloading methods for various station types. Stations also include a unique feature: managing cargo flows.
Industry objects are one of the more simple objects that exist in the world. Industry inherit the global memory accessor and contain a "bag of methods". Industry produces and consumes cargo every few ticks of the game loop (which is covered in more detail in part 7. The GUI is substantially different from any other world object GUI.
The World Map
The map technically isn't part of the object model because the data aren't encapsulated. The map lives as heap structures accessible through a pair of global pointer arrays (_m, _me) using helper functions in the global namespace. The map was probably an early component of the game design before they brought in the object model. Since it worked well and is likely optimized in this form, there was no need to refactor as the project evolved.
The map is generated during initialization (discussed in part 6) using custom memory allocation functions (discussed in part 5). I won't go through code details here, but it is good to understand the terminology so you can follow the official documentation. Let's make the distinctions among these terms:
- Tile - A single basic unit of the world map
- Map - The logical arrangement of the world as an (X,Y) tile grid.
- Landscape - The contents of the world as stored as data within tiles
- View(port) - The visible world. Tiles arranged by Map augmented by Landscape
The map tiles are initially declared and initialized as global pointers [map.cpp:32]:
Tile *_m = NULL;          // Tiles of the map
TileExtended *_me = NULL; // Extended Tiles of the map
During initialization, the pointers are allocated with a structure array [map.cpp:64]:
_m = CallocT<Tile>(_map_size);
_me = CallocT<TileExtended>(_map_size);
Both tile structures are bitfields with specific meaning based on type:
struct Tile {
   byte   type;   // The type
   byte   height; // The height of the northern corner.
   uint16 m2;     // Primarily used for indices to towns, industry, stations
   byte   m1;     // Primarily used for ownership information
   byte   m3;     // General purpose
   byte   m4;     // General purpose
   byte   m5;     // General purpose
};

struct TileExtended {
   byte m6;       // General purpose
   byte m7;       // Primarily used for newgrf support
};
Interpreting these bitfields is described best in this excerpt from the official documentation.
One lingering question that I have:
Why are two separate structs defined for related map data?
My guess is that the second struct was added long after the first, but simply adding new fields wasn't feasible because existing operations assume that each Tile is 8 byte long. Adding a 9th and 10th byte may break optimizations. A simple clue is the assertion that sizeof(Tile) == 8. I added a 9th members after m5, rebuild and run, but I didn't see any obvious effects. Either the complication is platform-specific, or it is a subtle performance issue that isn't obvious. For many optimizations, it's a good idea to make structure size a power of 2 to maintain field alignments. It was easier to add another struct of size 2 rather than double the size of the existing to 16. My other guess is that the second struct required different optimizations than those applied to the first. Anyway, if anyone with direct experience on this code base can point me to what specifically breaks, I'll add it to this write up.
Now for a better look at the display of maps
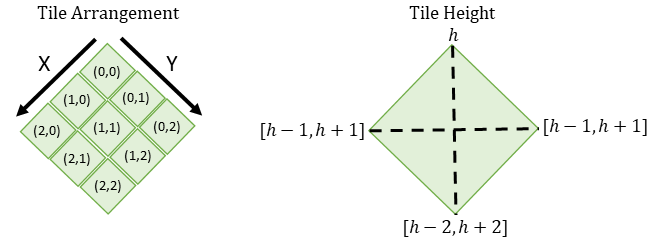
The diagram on the left shows how the tiles are arranged on the X and Y plane when viewed on the screen. Tiles in the array are stored in X-major order, which means that the next tile will likely be SW of the previous when viewed on the screen. The exception is when we change to a new Y.
The diagram on the right shows that the height of a tile is considered to be the 'top' (northern-most) corner. The left and right points can be at most 1 height different from both the top and each other. The bottom corner may be up to 2 height units different than the top. The effect of height difference is that tiles appear 'folded' along these dashed lines in to verticies. Consequently, there are 19 possible height configurations for a tile:
Final thoughts on objects in OpenTTD
OpenTTD's OO paradigm is a product of its era (2003). Modern engines have shifted to entity-component (ECS) designs for good reasons: flexibility, scalability, and explain-ability to name a few. While most agree that ECS provides the more generalized design methodology, OOP remains sufficient for many applications. OpenTTD is a special case where the result is already known before coding begins -- it copies the then-decade old Transport Tycoon Deluxe; We start with a feature-freeze in place. When the result is already well-known, it's almost trivial to dream up a comprehensive design using OO or even basic procedural techniques. Just don't expect fast turnaround or high team morale!
The objects we've just covered are examples of the object model patterns in OpenTTD. Many of the other objects not discussed follow one or more of the patterns above. The remainder this code review will shift to the more procedural aspects of the engine. Now, let's dive deep to the engine core and see how things work at a more fundamental level.
Part 5 - OpenTTD Core
Goal: Tear down the engine core to discover interfaces and services
The core source is a good place to start, especially if you have little experience with C++ templates. The core may seem complex and 'over-engineered', but it facilitates smooth development of actual game layered above. The core replicates many ideas that most programmers already use so I'll try to connect common dots to show how it supports the game development. I'll walk through all ~2000 lines of source since I don't see this code changing as OpenTTD development continues. If you have experience using a commercial game engine, you typically won't write core code.
Templates provide a family of interfaces with compile-time type guarantees which are used throughout the project rather than STL and standard library alternatives. Most unsafe functions are disabled by default to prevent error-prone code from creeping in (see src/safeguards.h).
We'll start at the bottom with basic safe memory allocation. Then build a sequence of structures that end with the primary mechanism for game objects: the pool allocator
Type-safe memory allocation
Consider our friend malloc(), prototype: void* malloc (size_t size). You ask for an arbitrary number of bytes and receive a pointer to a base of memory that is at least that size. What could possibly go wrong?
Fortunately, we don't have to care. The OpenTTD core creates a unique malloc() function for every possible game object type used in the code base. Consider this code snippet from alloc_func.hpp (comments removed):
template <typename T>
static inline T *MallocT(size_t num_elements)
{
	if (num_elements == 0) return NULL;

	CheckAllocationConstraints<T>(num_elements);

	T *t_ptr = (T*)malloc(num_elements * sizeof(T));
	if (t_ptr == NULL) MallocError(num_elements * sizeof(T));
	return t_ptr;
}
Restated in English: For every possible type, define a MallocT() function that takes the number of requested objects (not bytes) and returns a pointer to the first object. If no objects are requested, return a NULL pointer. Otherwise, verify the request, malloc() the number of bytes requested, verify the result, and return the pointer.
Function templates like this wrap the common C memory allocation functions (calloc, realloc, etc). Now let's use this in a generic object: The zeroed-memory allocator object defined in alloc_type.hpp:
class ZeroedMemoryAllocator
{
 public:
  ZeroedMemoryAllocator() {}
  virtual ~ZeroedMemoryAllocator() {}

  inline void *operator new(size_t size)    { return CallocT<byte>(size); }
  inline void *operator new[](size_t size)  { return CallocT<byte>(size); }
  inline void  operator delete(void *ptr)   { free(ptr); }
  inline void  operator delete[](void *ptr) { free(ptr); }
};
A function from the CallocT() family is used inside the overloaded 'new' operator of this class. ZeroedMemoryAllocator is the progenitor of a hundreds of concrete objects in OpenTTD. Most of which ultimately support the GUI, Graphics, and Windowing subsystem.
Key functions:
MallocT- Safe mallocCallocT- Safe callocReallocT- Safe reallocAllocaM- Safe stack allocator which must be a macro due to caller scopeMemCpyT- Safe memcpyMemMoveT- Safe memmoveMemSetT- Safe memsetMemCmpT- Safe memcmpMemReverseT(1) - Reverses memory block. Takes pointer and sizeMemReverseT(2) - Reverses memory block. Takes two pointers
Key classes:
SmallStackSafeStackAlloc- Allocate a type-safe data array on the stack, otherwise uses heap.ReusableBuffer- Type-safe data bufferZeroedMemoryAllocator- Generic zero-initialized allocator base classAutoFreePtr- The OpenTTD smart pointer
Type-safe data structures
Armed with a few type-safe functions, let's think how OpenTTD uses these functions to implement a type-safe vector in smallvec_type.hpp. I've trimmed the code below for comments, assertions, inline directives, some function code (as noted). I've left one-line function bodyies in place. I've also changed spacing and reordered functions to to better fit this page. Please refer to the actual source file for all the extras.
class SmallVector {
protected:
  T *data;       /* The pointer to the first item */
  uint items;    /* The number of items stored */
  uint capacity; /* The available space for storing items */

public:
  /* Ctors and Dtors */
  SmallVector() : data(NULL), items(0), capacity(0) { }
  SmallVector(const SmallVector &other) : data(NULL), items(0), capacity(0)
    { this->Assign(other); }

  template <uint X>
  SmallVector(const SmallVector<T,X>&other):data(NULL),items(0),capacity(0)
    { this->Assign(other); }

  SmallVector &operator=(const SmallVector &other)
    { this->Assign(other); return *this; }

  template <uint X>
  SmallVector &operator=(const SmallVector<T, X> &other)
    { this->Assign(other); return *this; }

  ~SmallVector() { free(this->data); }

  /* Member functions that we're not interested in */
  void Clear()                                          { this->items = 0; }
  void Reset()                                             { /* Trimmed */ }
  bool Include(const T &item)                              { /* Trimmed */ }
  const T *Find(const T &item) const                       { /* Trimmed */ }
  T *Find(const T &item)                                   { /* Trimmed */ }
  T *Insert(T *item)                                       { /* Trimmed */ }
  int FindIndex(const T &item) const                       { /* Trimmed */ }
  void ErasePreservingOrder(uint pos, uint count = 1)      { /* Trimmed */ }
  void ErasePreservingOrder(T *item, uint count = 1)       { /* Trimmed */ }
  void Compact()                                           { /* Trimmed */ }
  void Resize(uint num_items)                              { /* Trimmed */ }
  bool Contains(const T &item) const {return this->Find(item)!=this->End();}
  void Erase(T *item)                 { *item = this->data[--this->items]; }
  uint Length() const                                { return this->items; }
  const T *Begin() const                              { return this->data; }
  T *Begin()                                          { return this->data; }
  const T *End() const                  { return &this->data[this->items]; }
  T *End()                              { return &this->data[this->items]; }
  const T *Get(uint index) const              { return &this->data[index]; }
  T *Get(uint index)                          { return &this->data[index]; }
  const T &operator[](uint index) const        { return this->data[index]; }
  T &operator[](uint index)                    { return this->data[index]; }

  /* Member functions to look at */
  template <uint X>
  void Assign(const SmallVector<T, X> &other)
  {
    if ((const void *)&other == (void *)this) return;

    this->Clear();
    if (other.Length() > 0)
      MemCpyT<T>(this->Append(other.Length()),other.Begin(),other.Length());
  }

  T *Append(uint to_add = 1)
  {
    uint begin = this->items;
    this->items += to_add;

    if (this->items > this->capacity) {
      this->capacity = Align(this->items, S);
      this->data = ReallocT(this->data, this->capacity);
    }

    return &this->data[begin];
  }
};
Think of this class as a little cousin to std::vector. The parameterized and copy constructors call Assign(), which calls Append(). Thus every non-trivial instantiation relies on the ReallocT and MemCpyT. Type-safety of these objects is guaranteed at compile-time because the memory allocations are also guaranteed. As with all templates, any use of SmallVector in code will generate functions for the provided types, to include generating functions for MemCpyT and Realloc, as highlighted above.
Fun side experiment: Dump the openttd binary and see the usage of SmallVector after compilation
$ objdump -t openttd | grep SmallVector | wc -l
125   ## 125 functions from SmallVector class template (including nested)

$ objdump -t openttd | grep SmallVector
[...output cut...]
00658330 l F .text  _ZNK11SmallVectorIPK7VehicleLj32EEixEj.isra.28.part.29
004e5c3a l F .text  _ZN11SmallVectorIPK5GroupLj32EEixEj.isra.33.part.34
004e5c56 l F .text  _ZN11SmallVectorIPK7VehicleLj32EEixEj.isra.35.part.36
004e638e l F .text  _ZN11SmallVectorIPK8IndustryLj32EEixEj.isra.66.part.67
004e63aa l F .text  _ZN11SmallVectorI10CargoesRowLj4EEixEj.isra.69.part.70
[...output cut...]
These mangled names from the compilation process ensure that all templates generate unique signatures. Naming in g++ follows the IA64 ABI convention. For instance, the middle function (3rd shown) has C++ linkage, an 11 letter base name (SmallVector), a type, 7 letter parameter name (Vehicle), another type, 32 is the second argument (the size), and so on.
The pattern continues in several other core data structures:
EnumPropsT- Component class of TinyEnumT with public visibilityMakeEnumPropsT- Base class for EnumPropsTTinyEnumT- Enum container with controllable storage size and several operationsSimpleTinyEnumT- Slimmer Enum containerOverflowSafeInt- Over-engineered black magicSmallPair- Key/Value tuple containerSmallMap- Vector of SmallPairsSmallMatrix- 2D array containerSimplePool- Reusable memory poolSmallStack[Item]- Minimal stack with a base classSmallVector- Type-safe vector (discussed above)AutoFreeSmallVector- Extends SmallVector by auto-freeing dataAutoDeleteSmallVector- Extends SmallVector by auto-deleting data
Pool allocators
We can now climb our type-safe scaffolding and look at the backbone of OpenTTD: Memory Pools.
Pools are the memory allocation technique for many of the concrete game objects (vehicles, towns, industries, and more). We'll use the ideas presented above to piece together the idea of a memory pool and then show how the idea plugs in to a game subsystem. Some high-level design points to keep in mind:
- OpenTTD pools provide immediate access to data through indexing (Good performance)
- Pools manage memory resources while avoiding pathological allocation behavior (no leaks, managed fragmentation)
- Generic pools are a complex idea in OpenTTD. If you grok it, you can be a contributor!
Functionally, an OpenTTD-style memory pool is simple if you've ever built a data structure: Make a data array, add metadata variables describing the array, then throw in functions which manage array elements and update the metadata. For memory pools, this data array contains pointers to allocated objects. Consider this:
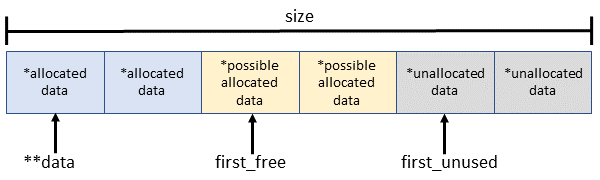
Add to this diagram a counter, 'items', that tracks the number of items currently allocated and we have the basic design of the memory pool in OpenTTD.
We can deduce some common operations:
- Scanning all objects means searching from item 0 to first_unused.
- Finding a free item means search from first_free onward.
- Destroy an object by decrementing the items counter. Then update first_free to object index if it is lower than first_free now.
- If first_unused == size, then we're out of space and need to reallocate more to the pool.
- Allocating a new object requires searching for the first free space, malloc the item and update the pointer, and incrementing the 'items' counter.
- We can also quickly estimate pool fragmentation with first_unused - first_free.
While these operations are simple, the real complexity of OpenTTD memory pools lies in their construction. It's the construction that solves the more challenging problems:
- Type-safety - Pools and their operations need to be type-safe. to the point where objects have no knowledge or access to members and functions beyond their own type and own pool. Think minimum exposure
- Code Reuse - We should only define pools, their fields, properties, and member functions once. Don't repeat code.
- Scalability - We should be able to make new pools with new object types with minimal effort
The OpenTTD solution for these problems is generic programming (templates) with reliance on macros for compile-time type declarations.
The Generic Memory Pool
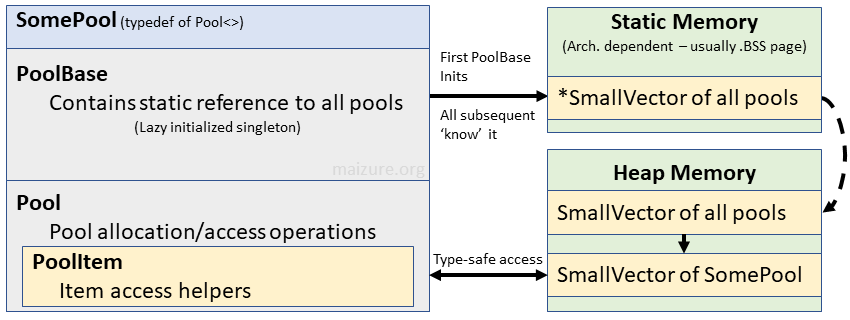
The generic memory pool is essentially a 2D array (non-contiguous vector of vectors) that retains type-safe access despite all possible object subtypes living within the top-level array. This is achieved through layers of templates which generate the appropriate type-specific functions to access primary and secondary vectors and ultimately the 'home' on the heap. This design lies across three source files in (openttd)/src/core/: pool_type.hpp, pool_func.hpp, and pool_func.cpp. The object is broken up in to several components:
- PoolBase - Non-template base class that creates and accesses all memory pools.
- Pool - Base class template which inherits PoolBase. Provide type-specific access functions depending on object type.
- PoolItem - Nested base class within Pool to access specific items. Concrete game objects inherit this and estblish a unique index in to the pool.
When a new memory pool object is instantiated, it finds its type pool in memory (possibly creating it), then appends itself to the pool. The object has a littany of type-specific pool access functions declared and defined in pool_func.hpp. For example, allocating a new pool item has the prototype: DEFINE_POOL_METHOD(void *)::GetNew(size_t size). Naturally, the prototype we see hides the real signature with this macro:
#define DEFINE_POOL_METHOD(type) \
	template <class Titem, typename Tindex, \
                 size_t Tgrowth_step, size_t Tmax_size, \
                 PoolType Tpool_type, bool Tcache, bool Tzero> \
                 type Pool<Titem, Tindex, Tgrowth_step, \
                 Tmax_size, Tpool_type, Tcache, Tzero>
Staring at this, you can see that signature is a template that also doubles as the namespace - a typical pattern for defining methods for a templated type. The benefit is that we now have generic methods that match the types needed for items stored in the SmallVector. As you can see, the price of type-safe access can be painful. Many of the confusing points (i.e. macro expansions) are best illustrated through example. Let's do that now.
A Specific Memory Pool
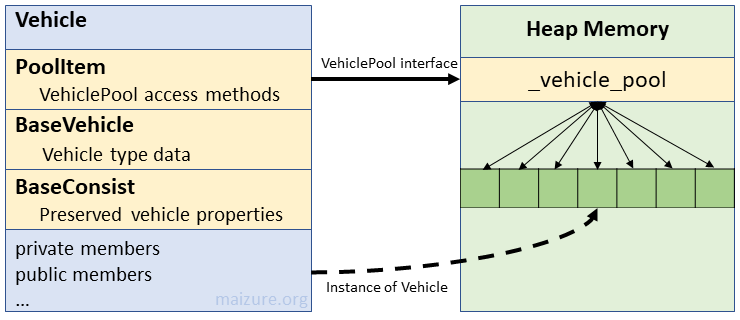
Vehicles are specified across 8 files, but we'll only need to look at two: vehicle_base.h and vehicle.cpp. Let's start with the header file:
...
Line 187: typedef Pool<Vehicle, VehicleID, 512, 0xFF000> VehiclePool;
Line 188: extern VehiclePool _vehicle_pool;
...
Line 212: struct Vehicle : VehiclePool::PoolItem<&_vehicle_pool>, ... {
What we see:
- Line 187 - The type VehiclePool is an alias for Pool
- Line 188 - A global points to the actual pool object (instantiated in
vehicle.cpp) - Line 212 - A Vehicle object inherits operations to access this vehicle pool
Recall that our generic memory pool automatically registers itself with the global memory pool vectors. When game objects like vehicles inherit the generic memory pool, the objects now register themselves during instantiation. Hence, all game vehicles are now globally accessible.
Now in the source file:
...
Line 92: VehiclePool _vehicle_pool("Vehicle");
Line 93: INSTANTIATE_POOL_METHODS(Vehicle)
Here we see a global memory pool instantiated with a name argument. Then we see another macro, which expands to the prototypes for all the PoolItem functions that a Vehicle object may need to use. This must be done here in the source file (vehicle.cpp) because we now know the object type that we will use. Remember that the functions were defined without knowledge of the objects that will eventually use them. The macro is back in pool_func.hpp:
#define INSTANTIATE_POOL_METHODS(name) \
    template void * name ## Pool::GetNew(size_t size); \
    template void * name ## Pool::GetNew(size_t size, size_t index); \
    template void name ## Pool::FreeItem(size_t index); \
    template void name ## Pool::CleanPool();

/*...in the case of Vehicle, we get these declarations...*/
    template void * VehiclePool::GetNew(size_t size); \
    template void * VehiclePool::GetNew(size_t size, size_t index); \
    template void VehiclePool::FreeItem(size_t index); \
    template void VehiclePool::CleanPool();
Let's summarize:
## A Vehicle inherits a set of methods to access the VehiclePool
vehicle.cpp:92 - VehiclePool _vehicle_pool("Vehicle");
vehicle.cpp:93 - INSTANTIATE_POOL_METHODS(Vehicle)
vehicle.cpp:212 - struct Vehicle : VehiclePool::PoolItem<&_vehicle_pool>

## A VehiclePool is a generic memory pool with type Vehicle
vehicle_base.h:187 - typedef Pool<Vehicle,VehicleID,512,0xFF000> VehiclePool

## A generic memory pool associates to a SmallVector of all pool types
pool_type.hpp:29 - typedef SmallVector<struct PoolBase *, 4> PoolVector

## A SmallVector is an array of many pointers to objects on the heap
smallvec_type.hpp:31-33 - T *data; uint items; uint capacity;
The structure underlying the VehiclePool appears throughout the code base. Here are all the specific memory pools instantiated in OpenTTD:
| Type | Global | Max Size | Location |
|---|---|---|---|
| CargoPacketPool | _cargopacket_pool | 1024 | cargopacket.h |
| CargoPaymentPool | N/A | 1,044,480 | economy_base.h |
| CompanyPool | _company_pool | * | company_base.h |
| DepotPool | _depot_pool | 64,000 | depot_base.h |
| EnginePool | N/A | 64,000 | engine_base.h |
| EngineRenewPool | _enginerenew_pool | 64,000 | engine_base.h |
| IndustryPool | _industry_pool | 64,000 | industry.h |
| LinkGraphPool | N/A | 65,535 | linkgraph.h |
| LinkGraphJobPool | N/A | 65,535 | linkgraphjob.h |
| NetworkAdminSocketPool | _networkadminsocket_pool | * | network_admin.h |
| NetworkClientInfoPool | _networkclientinfo_pool | * | network_base.h |
| NetworkClientSocketPool | _networkclientsocket_pool | * | network_server.h |
| SpriteGroupPool | _spritegroup_pool | 1,073,741,824 | newgrf_spritegroup.h |
| ObjectPool | N/A | 16,711,680 | object_base.h |
| OrderListPool | _orderlist_pool | 64,000 | order_base.h |
| RoadStopPool | _roadstop_pool | 64,000 | roadstop_base.h |
| SignPool | _sign_pool | 64,000 | signs_base.h |
| StationPool | _station_pool | 64,000 | station_base.h |
| StoryPagePool | N/A | 64,000 | story_base.h |
| StoryPageElementPool | N/A | 64,000 | story_base.h |
| SubsidyPool | _subsidy_pool | 256 | subsidy_base.h |
| VehiclePool | _vehicle_pool | 1,044,480 | vehicle_base.h |
*Some 'Max Sizes' are macros or run-time configurable
You can probably guess that the engine will often iterate over Pool data, especially those with global access. The pool structure is complicated enough that we won't want to construct a loop by hand for every variety of Pool. Instead, the developers defined macros for the generic pool and pool subtypes to assist. Let's trace the iterator for the Vehicle pool:
## Loop over all Vehicles in the pool (vehicle_base.h:986)
#define FOR_ALL_VEHICLES(var) FOR_ALL_VEHICLES_FROM(var, 0)

## Loop over some Vehicles in the pool (vehicle_base.h:980)
#define FOR_ALL_VEHICLES_FROM(var, start) \
        FOR_ALL_ITEMS_FROM(Vehicle, vehicle_index, var, start)

## Loop over some items in any pool (core/pool_type.h:316)
#define FOR_ALL_ITEMS_FROM(type, iter, var, start) \
    for (size_t iter = start; var=NULL, iter < type::GetPoolSize();iter++)\
        if ((var = type::Get(iter)) != NULL)
Families of iterator macros appear dozens of times in the engine code, especially the game loop. The macro names are much more clear than resulting for loop -- and probably avoids a handful of bugs.
Final thoughts on memory pools
So what's the benefit of the considerable amount of code behind OpenTTD's memory pools? First and foremost: Any game object instantiated will automatically register with the memory subsystem and remains accessible in constant time. In limited cases, fast allocation happens through memory block reuse using a cache (free-list) of dead allocations. All of these operations happen with compile-time type guarantees -- the compiler will warn developers of many problems before they happen. Ultimately, developers working on the 'game' don't need to concern themselves with availability, correctness or efficiency of memory when instantiating new game objects.
Other Core concepts
Mention some specialized functions (random nums, sorting, string functions, etc)
Key classes/structs:
Point- An XY pairDimension- A width and height pairRect- Four points of a rectanglePointDimension- An XY/WH rectangle descriptionPair- Signed integer tupleRandomizer- Random number object
Core Source
Refer to the appendix for a code walkthrough of all the gory details.
Part 6 - Startup and Initialization
Goal: Tear apart the start up process
Now that we're familiar with the basic services and subsystems of the OpenTTD engine, let's think about how this game spins up. I'll warn that most bootstrap code is strictly procedural with a goal of discovering and changing the environment to fit the needs of upcoming runtime. For OpenTTD, this means discovering and associating devices/drivers with the application. Since the user has control over this process via command-line switch, those should be processed early. Let's start at the beginning.
OpenTTD Entry Point
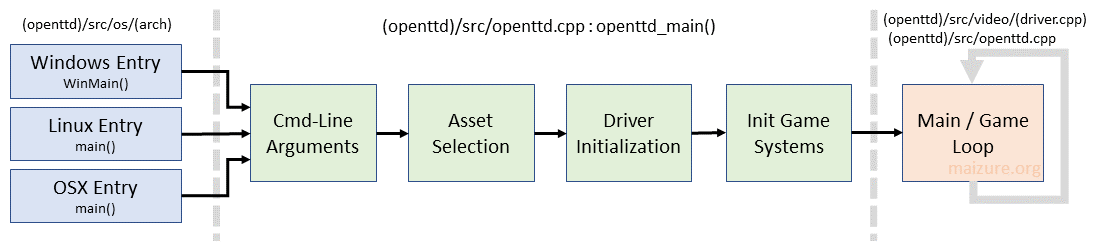
All C and C++ programs have a platform-specific entry point. Consequently, OpenTTD must have a separate entry point defined for all possible platforms. During compilation, only the entry point for the target platform is built. All platform specific code is under (openttd)/src/os/ and then under system type subfolders. Entry points include:
windows/win32.cpp:413 - int APIENTRY WinMain(HINSTANCE,HINSTANCE,LPSTR,int)
os2/os2.cpp:173       - int CDECL main(int argc, char *argv[])
unix/unix.cpp:261     - int CDECL main(int argc, char *argv[])
In all cases, the entry point is less than 25 lines long; It validates command line arguments and then calls a common entry point (openttd_main(int argc, char *argv[])) in (openttd)/src/openttd.cpp. This common function approaches 400 lines and does the heavy lifting of initialization including argument handling, music/sound/graphics/network resource gathering, main menu demo world generation and kicking off the menu game loop.
The first ~10% of the entry point simply declares application-level pointers for drivers, which will be passed or exported as needed. A Dimension pair for screen resolution with defaults to 0x0. Two globals enum types are defined to hold game state:
_game_mode- The current game mode, which starts at main menu_switch_mode- The upcoming game mode, which is still main menu
With pointers and globals defaulted to initial values, we're ready to scrape the command line for user-specific options.
Command Line Arguments
Here are the documented command line options:
$ ./openttd -h
OpenTTD g231402fb
Command line options:
  -v drv              = Set video driver (see below)
  -s drv              = Set sound driver (see below) (param bufsize,hz)
  -m drv              = Set music driver (see below)
  -b drv              = Set the blitter to use (see below)
  -r res              = Set resolution (for instance 800x600)
  -h                  = Display this help text
  -t year             = Set starting year
  -d [[fac=]lvl[,...]]= Debug mode
  -e                  = Start Editor
  -g [savegame]       = Start new/save game immediately
  -G seed             = Set random seed
  -n [ip:port#company]= Join network game
  -p password         = Password to join server
  -P password         = Password to join company
  -D [ip][:port]      = Start dedicated server
  -l ip[:port]        = Redirect DEBUG()
  -f                  = Fork into the background (dedicated only)
  -I graphics_set     = Force the graphics set (see below)
  -S sounds_set       = Force the sounds set (see below)
  -M music_set        = Force the music set (see below)
  -c config_file      = Use 'config_file' instead of 'openttd.cfg'
  -x                  = Do not automatically save to config file on exit
  -q savegame         = Write some information about the savegame and exit

[...cut valid options discovered for -vsmbISM on my system...]
Mechanically, handling arguments is simple: Loop through the argument vector until there are no more arguments to process. OpenTTD uses a helper to validate and retrieve arguments, but the pattern is clear. Check the switch value, then check the input string. Repeat until all arguments are eaten. The code for this process takes up roughly 40% of openttd_main(). I've covered the painstaking detail in the code walkthrough, however the general tasks we have to do for each switch are:
| Switch(s) | Procedure |
|---|---|
| -ISMmsvb | Free the resource pointer then point to a copy of the command line argument. In most cases there is no need to free the resource pointer since it should be NULL. But there are edge cases if a command line arguments appear multiple times. C spec says free(NULL) results in nothing -- better safe than sorry! |
| -D | A dedicated server means that we're not using any local resources so free all driver and asset pointers to null. Assert the dedicated server flag and enable debugging. User should have provided address and port information so grab those arguments and store them for later. |
| -f | For now, dedicated servers only need a flag used to trigger a fork later |
| -nl | We only need to save the connection target string for now. |
| -pP | Save the provided password string |
| -r | Separate the resolution components and store them in the Dimension struct |
| -t | Save the input string as an integer for the year |
| -d | Initialize a debug console and configure using provided argument |
| -e | Force the next state to be editor mode, if we're not already set up to auto-load a game |
| -g | Checks if the input argument is a valid save game. If so, we load it immediately, if not we start a new game without going to the main menu. This involves manipulating the _switch_mode game state global. |
| -q | Check if the input save file is a valid save game. If so, output basic game information to STDOUT and STDERR via a helper function. |
| -G | Get the random seed value argument, convert it to an integer and save. |
| -c | Override the pointer to the default configure file with the provided |
| -x | Clear the flag to save config files on exit |
| -h | Output the command-line argument options. This also breaks processing by override our argument vector iterator to force display of the list as well as resolving all potential audio/video drivers, AI scripts, and various other options. |
After all arguments are handled and the resource pointers have some useful value, it's time to initialize assets and devices.
Video & Audio Resources
Video and audio are handled in two parts: the platform-independent work and the platform-specific work. The latter depends on the former so we'll start with the work common to all systems: Loading assets in to memory. As with command-line arguments, these procedures make up about 150 lines (~40%) of the entry point.
Loading Assets
Languages and fonts are automatically loaded only by examining the configuration file. For the remaining asset types, we check for a command-line argument and then default to the configuration file. Hopefully all asset pointers eventually have a useful value. Expected values include:
graphics_set- original_dos, original_windows, OpenGFXsounds_set- NoSound, original_dosmusic_set- NoMusic, original_windows
The mechanism for loading the assets is a fairly elaborate class (BaseMedia), which inherits file I/O operations. The concrete object is a polymorph to the specific asset type (BaseGraphics, BaseSound, BaseMusic). The BaseMedia<type>::SetSet() operation pushes the final selection. I'm not going to go in to detail about how this operates since we're only concerned with the entry point usage. For now, just know that the entry point verifies that the chosen asset set exists in the baseset directory and is usable.
For further research, check outbase_media_base.h, base_media_func.h, and the fileio_* source family. The scalability of this asset loader is an impressive subsystem in its own right.
Initializing Drivers
After asset selection, the entry point initializes drivers via a factory. Due to the many combinations of possible interfaces (allego, sdl, cocoa, win32, X, etc), A generic driver object provides a virtual interface and then inherits the actual operations as previously determined. Again, I won't go in exacting detail here, but check out the entry point code walkthrough for more information. The drivers chosen are:
- GFX:
DriverFactoryBase::SelectDriver()implementingvideo/video_driver.hpp - Blitter:
BlitterFactory::SelectDriver()implementingblitter/base.hpp - Sound:
DriverFactoryBase::SelectDriver()implementingsound/sound_driver.hpp - Music:
DriverFactoryBase::SelectDriver()implementingmusic/music_driver.hpp
Initialize Game Systems
The next step is to initialize game systems, including the game world. For the main menu, we only need to generate a temporary mini world. Behind the scenes, this process initializes many data structures and objects in use throughout the game. We start with a call to GenerateWorld()
Genworld kicks off basic initialization of game systems, which begins by allocating space for the map. Next we have a laundry list of tasks including:
- Reset all memory pools
- Initialize sound and music
- Initialize GUIs
- Load AIs
- Load game scripts
- Set up economy baseline
Next up is generating the map. The main menu is trivial since it's a pre-built city that demonstrates various vehicles. For normal maps, world generation occurs in GenerateLandscape(). World generation deserves an article in its own right, but I won't be covering it here.
Main Menu Start
After resolving all resources, drivers, and game systems, we're ready for the main menu. OpenTTD displays the mini world running in the background, which you can see when the game loads up. Thus, the entry point also calls the world generator to create a scene that plays while the user makes a game choice. The entry point wraps up by kicking off the Main Menu game loop in via the method VideoDriver::GetInstance()->MainLoop(). This method does not return until the user gracefully exits the application. This leads us directly to the next section: The Game Loop
The entry point wraps up with some shutdown code since the application must eventually exit with a return value. I'll save those details for the code walkthrough.
Part 7 - The Game Loop
Goal: Trace the game loop
Finally, the fun part -- You've started a transportation empire, have a few stations and depots built, the cash is rolling in but the competition isn't far behind. What is actually going on behind the scenes that drives the game forward while maintaining all the moving parts? For starters, most games implement a game loop that looks something like this:

While this loop might be a good start for Pong, we need to expand the idea for OpenTTD.
The initialization section above ended with a call toVideoDriver::GetInstance()->MainLoop(); This suggests that even a game as complex as OpenTTD begins and ends its life using the rendering subsystem. Now that we're familiar with the engine core, initialization, and various subsystems, we're ready to see how it all fits together:
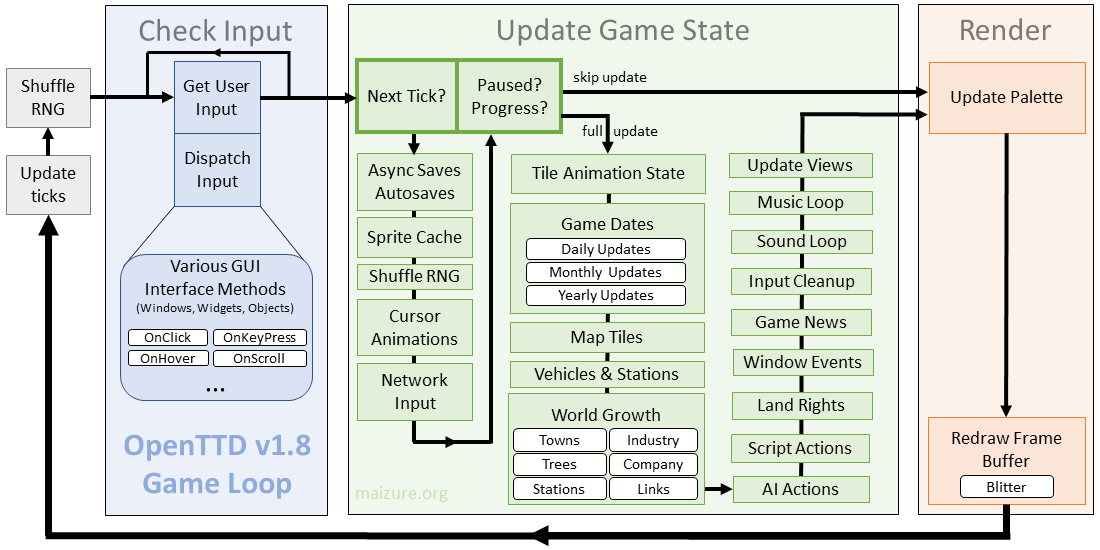
This diagram traces the game loop procedures to roughly three stack frames. We can get a sense of the tasks the game loop will accomplish in one cycle. Asynchronous elements, such as GUI interactions and random events, aren't shown. Some work is multithreaded, notably the renderer the saveload subsystems. Some important design points:
- The shortest path through the game loop is short. A game loop should only do work when there's work to be done and not much else. That is the case with OpenTTD. Most of the time, there is no input so we quickly move to update state. Usually, we're not on an update tick, so we jump quickly to the renderer. The renderer only updates 'dirty' sections of the screen (not explicitly pictured above), thus the loop restarts quickly and we're ready to check for more work.
- The game loop prioritizes user input for maximum responsiveness. All user input is dispatched and executed at the start of every game loop. If multiple inputs occur, all are handled immediately. This is in contrast to state updates and rendering, which only happens at either specific times or under specific conditions. Prioritizing user input is standard practice since it is vital for user experience, and is a relatively rare situation -- there's never enough user input to stall a system.
Let's step through each of these blocks.
Pre-loop setup
MainLoop() Entry [video/sdl_v.cpp:656]
The video driver MainLoop() (not pictured above) starts off by getting the absolute tick value to later reference for tick updates. The blitter and palette are checked for the first time. Finally we create a separate rendering thread to execute the function DrawSurfaceToScreenThread(). This thread wraps the single-threaded drawing function with a mutex for synchronization. The thread sleeps until woken up for rendering time.
Loop Start
Game loop start [video/sdl_v.cpp:693]
The beginning of the game loop is simply an infinite for(;;) within the video driver. This is natural since the SDL driver is used for both the first and last steps of the game loop -- reading input and writing output. The first step is to match the game loop ticks so that we can compare the difference later.
Update random numbers [video/sdl_v.cpp:695, core/random_func.hpp:89]
Increments the random number generator before we process input. Any input dispatch handlers that rely on randomization will be uncorrelated wit the previous cycle
Check Input
Get user input [video/sdl_v.cpp:697]
OpenTTD's SDL implementation includes a PollEvent() function listening for specific input types. Note that if multiple input events occur between a tick, the loop processes all of them before continuing.
Dispatch input [video/sdl_v.cpp:538]
After SDL captures input, it eventually dispatches it with a handler function based on the input type: HandleMouseEvent() or HandleKeyPress(). The preliminary mouse handler captures basic data about click targets, timings, and types before handling it to a window dispatcher in MouseLoop().
Update Game State
Game state updates do not always happen with each trip through the game loop. The first step is to check if enough time has elapsed and if so, perform part of the game state update in GameLoop(). Then we recheck if the game is paused or there is a modal progress update. If we're clear to make a full state update, we execute StateGameLoop(), which contains the more intensive procedures to update every object in the game world. If any of the conditions to skip updates exist, then we jump directly to rendering the screen.
We'll continue walkign the game loop assuming we're doing a full update.Handle Saves [openttd.cpp:1451]
Autosaves may occur according to the save settings. Saving is asynchronous (threaded), so first the engine checks if a save is already in progress. It then checks if we're due for another save.
Sprite cache [openttd.cpp:1459]
OpenTTD only keeps the most recently used sprites cached memory. The decision about which sprites to keep is decided by recent usage. The function IncreaseSpriteLRU() recomputes sprite usage among those currently in the cache.
Reshuffle RNG [openttd.cpp:1460]
Another bump of RNG provides an entropy barrier between the input and update phases.
Animate mouse cursor [openttd.cpp:1464]
The cursor may update at any time and so we check the state with CursorTick() and SwitchAnimatedCursor().
Handle network [openttd.cpp:1468]
Networking has an entire directory dedicated for source code to handle sending and receiving game state messages. Networking processing begins in NetworkBackgroundLoop() and NetworkGameLoop()
Update world or skip to render [openttd.cpp:1341]
Now we check if we're ready to do the second half of updated: The full world update. These only occur if the game is unpaused and there isn't background work in action (no modal progress bar).
Tile animations [openttd.cpp:1381]
Animated tiles are already organized in to a list, which the function AnimateAnimatedTiles() walks through and calls the tile's animation process in AnimateTile(). When tiles sets are initially loaded, a structure of animation function pointer is stored in an array indexed by tile type. This function simple invokes the function pointer.
Game dates [openttd.cpp:1382]
Every trip through the full game loop updates the game tick counter in the function IncreaseDate(). The game sets a ticks per day (DAY_TICKS) and thus has a basis for updating game dates and events on a daily, monthly, and yearly basis.
Update map tiles [openttd.cpp:1383]
All tiles have associated update functions that need to be called. RunTileLoop() hits all tiles in pseudorandom orders, but is guaranteed to hit all of them every 256 ticks. Like animations, the tile update function pointers are stated in an array indexed by tile type. The actual callback structs and functions are usually found in tiletype_cmd files.
Update all vehicles & stations [openttd.cpp:1384]
The function CallVehicleTicks() a work-intensive walk through all vehicles and associated stations to handle update events, such as cargo management, auto-replacement, movement, sounds, and more.
World growth [openttd.cpp:1385]
All other systems that require updates beyond tiles and vehicles happens in CallLandscapeTick(). It is a simple dispatcher to procedures that loop through all Towns, Industries, Companies, and others.
AI actions [openttd.cpp:1389]
The AI subsystem is an interpreter for squirrel script and deserves a chapter in its own right. For now, just know that during full updates, the AI::GameLoop() loops through all the companies and performs actions on its behalf. Don't forget to bring your own scripts or nothing much happens.
Script actions [openttd.cpp:1390]
The Game script system is organized very similar to the AI system in that you bring your own scripts and the engine scans the tokens and behaves accordingly. The tie in happens in Game::GameLoop()
Update company landcaping rights [openttd.cpp:1392]
Companies have time-based limits on their ability to dig up land and trees. These limits are updated in UpdateLandscapingLimits()
Window events [openttd.cpp:1394]
Certain game windows need to update after they're created. This is checked and handled in CallWindowTickEvent() to execute OnTick(). Since this function is virtual, behavior depends on the specific window type. One example is the mini-map window OnTick()
Game news [openttd.cpp:1395]
The NewsLoop() function updates the news as shown on the bottom status bar.
Input cleanup [openttd.cpp:1497]
The function InputLoop() calls several general functions check to Window state and clean up dangling issues, such as windows closed/deleted or window count soft limits.
Sound loop [openttd.cpp:1499]
Like the video driver, the sound driver uses provided external libraries. In my case, this is through SDL and it appears that there isn't a concrete implementation for MainLoop() provided by SDL.
Music loop [openttd.cpp:1500]
Music state is checked once per tick in MusicLoop(). Checks for music playing, updates state, and continues with a new song if necessary. The main menu case simply loops the menu music.
Update window viewports [video/sdl_v.cpp:757]
Updating windows involves looping through all the windows, setting dirty sections, then ultimately queuing redraw events for the minimum required sections. This step could probably be considered part of the renderer if it weren't skipped when no updates occur.
Render
Rendering happens single or multi-threaded depending on how the game initialized. Updates generally only occur if a window area was invalidated. OpenTTD supports palette cycling for some animations so the palette these cases are checked before the final frame buffer push.
Update palettes [video/sdl_v.cpp:774]
First we check the blitter animation setting in CheckPaletteAnim(). Depending on the setting, we call the appropriate blitter function to cycle palette.
Render [video/sdl_v.cpp:775]
The input to rendering is an updated backbuffer and a list of dirty sections. Rendering to the screen occurs in DrawSurfaceToScreen(). The process can be summed up like this: If nothing was updated, then there's no work to do. If any windows were invalidated, then run through the queued invalidations and blit from the back buffer surface to the frame buffer. If too many updates were queued, then just blit the entire backbuffer.
Loop End
MainLoop() Exit [video/sdl_v.cpp:779]
The only major task when the game loop ends is to join (exit) any threads dedicated to rendering.
Part 8 - Other parts of OpenTTD to explore
I can't possibly cover every facet of this huge project, but I had a long list of things that I considered breaking down. These didn't make the cut, but are still worthwhile:
- The world generator
- The blitter(s)
- The asset loaders
- The linkgraphs to manage connections
- Scripting for AI and other events
- Detailed widget generation and construction
Final thoughts
I allotted myself two weeks to go through this codebase and pull out a few fundamental ideas to share. The takeaway probably isn't OpenTTD itself, but rather the exercise in learning the basics behind open-source project. For a game, that means walking through the code organization, the object model (if any), the game loop, and basic initialization. Then devote any extra time to learning specific subsystems that are the most interesting to you. At that point, you're probably well-armed enough to make meaningful contributions to the project.
Part 9 - Appendix
Core Source Walkthrough
If you're interested in the entire core walkthrough, help me save bandwidth by downloading it compressed
| Source File | Purpose | Code |
|---|---|---|
| alloc_func.cpp | Allocator error handler functions | Code Walkthrough |
| alloc_func.hpp | Basic type-safe memory allocation routines | Code Walkthrough |
| alloc_type.hpp | Allocator object and type-safe data structures | Code Walkthrough |
| backup_type.hpp | Object to save and restore variables of all types | Code Walkthrough |
| bitmath_func.cpp | Several bitwise search operations | Code Walkthrough |
| bitmath_func.hpp | More bitwise math operations | Code Walkthrough |
| endian_func.hpp | Endian conversion functions | Code Walkthrough |
| endian_type.hpp | Platform-specific endianness macros | Code Walkthrough |
| enum_type.hpp | Extends enum capabilities | Code Walkthrough |
| geometry_func.cpp | Compute 2D bounding box | Code Walkthrough |
| geometry_func.hpp | Header for bounding box function | Code Walkthrough |
| geometry_type.hpp | Defines geometric types: Points, Dims, Rects, etc | Code Walkthrough |
| math_func.cpp | Basic math functions: lcm, gcd, int square root | Code Walkthrough |
| math_func.hpp | More generic math functions | Code Walkthrough |
| mem_func.hpp | Type-safe memory operations | Code Walkthrough |
| multimap.hpp | Custom multimap container | Code Walkthrough |
| overflowsafe_type.hpp | Integers that don't overflow | Code Walkthrough |
| pool_func.cpp | Memory pool base type functions | Code Walkthrough |
| pool_func.hpp | Type-safe memory pool methods | Code Walkthrough |
| pool_type.hpp | Memory pool hierarchy definitions | Code Walkthrough |
| random_func.cpp | Custom randomizer object functions | Code Walkthrough |
| random_func.hpp | More random support functions | Code Walkthrough |
| smallmap_type.hpp | Lightweight data structures for Map and Pair | Code Walkthrough |
| smallmatrix_type.hpp | Type-safe lightweight matrix data structure | Code Walkthrough |
| smallstack_type.hpp | Type-safe lightweight stack | Code Walkthrough |
| smallvec_type.hpp | Type-safe lightweight vector | Code Walkthrough |
| sort_func.hpp | Type-safe quicksort and gnome sort | Code Walkthrough |
| string_compare_type.hpp | String comparator | Code Walkthrough |